Centos 7 + SSM
[root@localhost ~]#
yum install system-storage-manager
Loaded plugins: fastestmirror, langpacks
Loading mirror speeds from cached hostfile
* base: ftp.cuhk.edu.hk
* extras: ftp.cuhk.edu.hk
* updates: ftp.cuhk.edu.hk
Resolving Dependencies
--> Running transaction check
---> Package system-storage-manager.noarch 0:0.4-5.el7 will be installed
--> Finished Dependency Resolution
Dependencies Resolved
===============================================================================================================================================================================================
Package Arch Version Repository Size
===============================================================================================================================================================================================
Installing:
system-storage-manager noarch 0.4-5.el7 base 106 k
Transaction Summary
===============================================================================================================================================================================================
Install 1 Package
Total download size: 106 k
Installed size: 402 k
Is this ok [y/d/N]: y
Downloading packages:
system-storage-manager-0.4-5.el7.noarch.rpm | 106 kB 00:00:00
Running transaction check
Running transaction test
Transaction test succeeded
Running transaction
Installing : system-storage-manager-0.4-5.el7.noarch 1/1
Verifying : system-storage-manager-0.4-5.el7.noarch 1/1
Installed:
system-storage-manager.noarch 0:0.4-5.el7
首先在ESXI 加多隻HARDDISK 係個GUEST 到
Complete!
[root@localhost ~]#
ssm list
-------------------------------------------------------------
Device Free Used Total Pool Mount point
-------------------------------------------------------------
/dev/fd0 4.00 KB
/dev/sda 70.00 GB PARTITIONED
/dev/sda1 500.00 MB /boot
/dev/sda2 64.00 MB 69.45 GB 69.51 GB centos
/dev/sdb 20.00 GB
-------------------------------------------------------------
---------------------------------------------------
Pool Type Devices Free Used Total
---------------------------------------------------
centos lvm 1 64.00 MB 69.45 GB 69.51 GB
---------------------------------------------------
-------------------------------------------------------------------------------------
Volume Pool Volume size FS FS size Free Type Mount point
-------------------------------------------------------------------------------------
/dev/centos/root centos 44.06 GB xfs 44.04 GB 40.49 GB linear /
/dev/centos/swap centos 3.88 GB linear
/dev/centos/home centos 21.51 GB xfs 21.50 GB 21.47 GB linear /home
/dev/sda1 500.00 MB xfs 496.67 MB 364.66 MB part /boot
-------------------------------------------------------------------------------------
[root@localhost ~]# df -h
Filesystem Size Used Avail Use% Mounted on
/dev/mapper/centos-root 45G 3.6G 41G 9% /
devtmpfs 1.9G 0 1.9G 0% /dev
tmpfs 1.9G 84K 1.9G 1% /dev/shm
tmpfs 1.9G 8.9M 1.9G 1% /run
tmpfs 1.9G 0 1.9G 0% /sys/fs/cgroup
/dev/mapper/centos-home 22G 33M 22G 1% /home
/dev/sda1 497M 158M 340M 32% /boot
tmpfs 380M 20K 380M 1% /run/user/42
tmpfs 380M 0 380M 0% /run/user/1000
[root@localhost ~]#
ssm add -p centos /dev/sdb
File descriptor 7 (/dev/urandom) leaked on lvm invocation. Parent PID 2903: /usr/bin/python
Physical volume "/dev/sdb" successfully created
Volume group "centos" successfully extended
[root@localhost ~]# ssm list
-------------------------------------------------------------
Device Free Used Total Pool Mount point
-------------------------------------------------------------
/dev/fd0 4.00 KB
/dev/sda 70.00 GB PARTITIONED
/dev/sda1 500.00 MB /boot
/dev/sda2 64.00 MB 69.45 GB 69.51 GB centos
/dev/sdb 20.00 GB 0.00 KB 20.00 GB centos
-------------------------------------------------------------
---------------------------------------------------
Pool Type Devices Free Used Total
---------------------------------------------------
centos lvm 2 20.06 GB 69.45 GB 89.50 GB
---------------------------------------------------
-------------------------------------------------------------------------------------
Volume Pool Volume size FS FS size Free Type Mount point
-------------------------------------------------------------------------------------
/dev/centos/root centos 44.06 GB xfs 44.04 GB 40.45 GB linear /
/dev/centos/swap centos 3.88 GB linear
/dev/centos/home centos 21.51 GB xfs 21.50 GB 21.47 GB linear /home
/dev/sda1 500.00 MB xfs 496.67 MB 364.66 MB part /boot
-------------------------------------------------------------------------------------
[root@localhost ~]#
ssm resize -s+2000M /dev/centos/root
File descriptor 7 (/dev/urandom) leaked on lvm invocation. Parent PID 3041: /usr/bin/python
Size of logical volume centos/root changed from 44.06 GiB (11279 extents) to 46.01 GiB (11779 extents).
Logical volume root successfully resized.
meta-data=/dev/mapper/centos-root isize=256 agcount=4, agsize=2887424 blks
= sectsz=512 attr=2, projid32bit=1
= crc=0 finobt=0
data = bsize=4096 blocks=11549696, imaxpct=25
= sunit=0 swidth=0 blks
naming =version 2 bsize=4096 ascii-ci=0 ftype=0
log =internal bsize=4096 blocks=5639, version=2
= sectsz=512 sunit=0 blks, lazy-count=1
realtime =none extsz=4096 blocks=0, rtextents=0
data blocks changed from 11549696 to 12061696
[root@localhost ~]#
ssm list volumes
-------------------------------------------------------------------------------------
Volume Pool Volume size FS FS size Free Type Mount point
-------------------------------------------------------------------------------------
/dev/centos/root centos 46.01 GB xfs 44.04 GB 40.45 GB linear /
/dev/centos/swap centos 3.88 GB linear
/dev/centos/home centos 21.51 GB xfs 21.50 GB 21.47 GB linear /home
/dev/sda1 500.00 MB xfs 496.67 MB 364.66 MB part /boot
-------------------------------------------------------------------------------------
[root@localhost ~]# df -h
Filesystem Size Used Avail Use% Mounted on
/dev/mapper/centos-root 46G 3.6G 43G 8% /
devtmpfs 1.9G 0 1.9G 0% /dev
tmpfs 1.9G 84K 1.9G 1% /dev/shm
tmpfs 1.9G 8.9M 1.9G 1% /run
tmpfs 1.9G 0 1.9G 0% /sys/fs/cgroup
/dev/mapper/centos-home 22G 33M 22G 1% /home
/dev/sda1 497M 158M 340M 32% /boot
tmpfs 380M 20K 380M 1% /run/user/42
tmpfs 380M 0 380M 0% /run/user/1000
[root@localhost ~]# ssm list
-------------------------------------------------------------
Device Free Used Total Pool Mount point
-------------------------------------------------------------
/dev/fd0 4.00 KB
/dev/sda 70.00 GB PARTITIONED
/dev/sda1 500.00 MB /boot
/dev/sda2 0.00 KB 69.51 GB 69.51 GB centos
/dev/sdb 18.11 GB 1.89 GB 20.00 GB centos
-------------------------------------------------------------
---------------------------------------------------
Pool Type Devices Free Used Total
---------------------------------------------------
centos lvm 2 18.11 GB 71.40 GB 89.50 GB
---------------------------------------------------
-------------------------------------------------------------------------------------
Volume Pool Volume size FS FS size Free Type Mount point
-------------------------------------------------------------------------------------
/dev/centos/root centos 46.01 GB xfs 45.99 GB 40.45 GB linear /
/dev/centos/swap centos 3.88 GB linear
/dev/centos/home centos 21.51 GB xfs 21.50 GB 21.47 GB linear /home
/dev/sda1 500.00 MB xfs 496.67 MB 364.66 MB part /boot
-------------------------------------------------------------------------------------
[root@localhost ~]#
ssm resize -s+18000M /dev/centos/root
File descriptor 7 (/dev/urandom) leaked on lvm invocation. Parent PID 3370: /usr/bin/python
Size of logical volume centos/root changed from 46.01 GiB (11779 extents) to 63.59 GiB (16279 extents).
Logical volume root successfully resized.
meta-data=/dev/mapper/centos-root isize=256 agcount=5, agsize=2887424 blks
= sectsz=512 attr=2, projid32bit=1
= crc=0 finobt=0
data = bsize=4096 blocks=12061696, imaxpct=25
= sunit=0 swidth=0 blks
naming =version 2 bsize=4096 ascii-ci=0 ftype=0
log =internal bsize=4096 blocks=5639, version=2
= sectsz=512 sunit=0 blks, lazy-count=1
realtime =none extsz=4096 blocks=0, rtextents=0
data blocks changed from 12061696 to 16669696
[root@localhost ~]# df -h
Filesystem Size Used Avail Use% Mounted on
/dev/mapper/centos-root 64G 3.6G 60G 6% /
devtmpfs 1.9G 0 1.9G 0% /dev
tmpfs 1.9G 84K 1.9G 1% /dev/shm
tmpfs 1.9G 8.9M 1.9G 1% /run
tmpfs 1.9G 0 1.9G 0% /sys/fs/cgroup
/dev/mapper/centos-home 22G 33M 22G 1% /home
/dev/sda1 497M 158M 340M 32% /boot
tmpfs 380M 20K 380M 1% /run/user/42
tmpfs 380M 0 380M 0% /run/user/1000
[root@localhost ~]
http://xmodulo.com/manage-lvm-volumes-centos-rhel-7-system-storage-manager.html
Logical Volume Manager (LVM) is an extremely flexible disk management scheme, allowing you to create and resize logical disk volumes off of multiple physical hard drives with no downtime. However, its powerful features come with the price of somewhat steep learning curves, with
more involved steps to set up LVM using multiple command line tools, compared to managing traditional disk partitions.
Here is good news for CentOS/RHEL users. The latest CentOS/RHEL 7 now comes with
System Storage Manager (aka
ssm) which is a unified command line interface developed by Red Hat for managing all kinds of storage devices. Currently there are three kinds of volume management backends available for
ssm: LVM, Btrfs, and Crypt.
In this tutorial, I will demonstrate how to manage LVM volumes with ssm. You will be blown away how simple it is to create and manage LVM volumes now. :-)
Preparing SSM
On fresh CentOS/RHEL 7, you need to install System Storage Manager first.
$ sudo yum install system-storage-manager
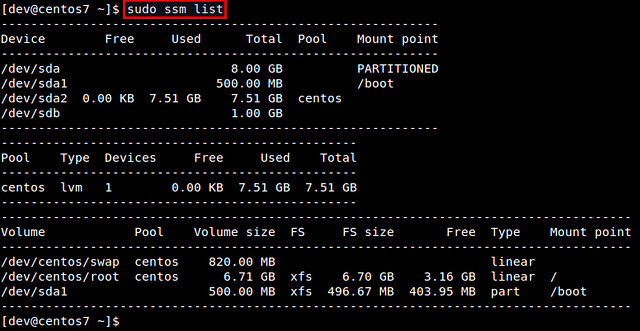
First, let's check information about available hard drives and LVM volumes. The following command will show information about existing disk storage devices, storage pools, LVM volumes and storage snapshots. The output is from fresh CentOS 7 installation which uses LVM and
XFS file system by default.
$ sudo ssm list
In this example, there are two physical devices ("/dev/sda" and "/dev/sdb"), one storage pool ("centos"), and two LVM volumes ("/dev/centos/root" and "/dev/centos/swap") created in the pool.
Add a Physical Disk to an LVM Pool
Let's add a new physical disk (e.g., /dev/sdb) to an existing storage pool (e.g., centos). The command to add a new physical storage device to an existing pool is as follows.
$ sudo ssm add -p <pool-name> <device>
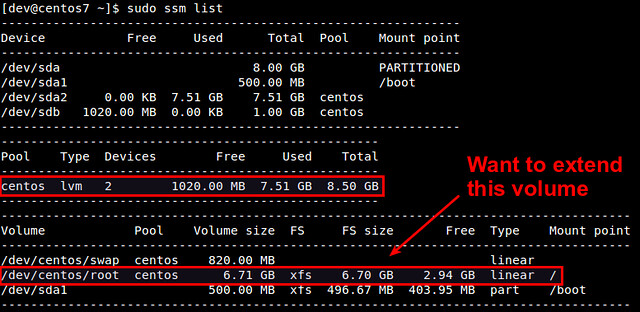
After a new device is added to a pool, the pool will automatically be enlarged by the size of the device. Check the size of the storage pool named centos as follows.
As you can see, the centos pool has been successfully expanded from 7.5GB to 8.5GB. At this point, however, disk volumes (e.g., /dev/centos/root and /dev/centos/swap) that exist in the pool are not utilizing the added space. For that, we need to expand existing LVM volumes.
Expand an LVM Volume
If you have extra space in a storage pool, you can enlarge existing disk volumes in the pool. For that, useresize option with ssm command.
$ sudo ssm resize -s [size] [volume]
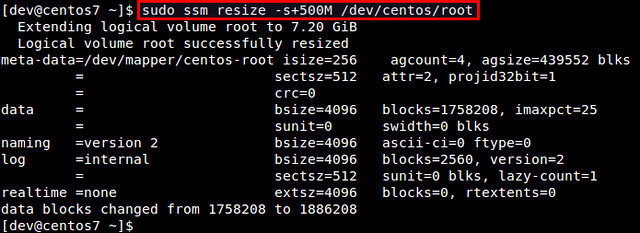
Let's increase the size of /dev/centos/root volume by 500MB.
$ sudo ssm resize -s+500M /dev/centos/root
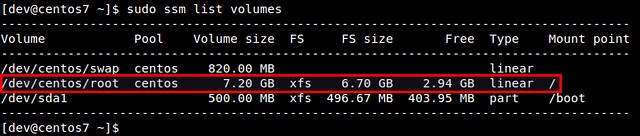
Verify the updated size of existing volumes.
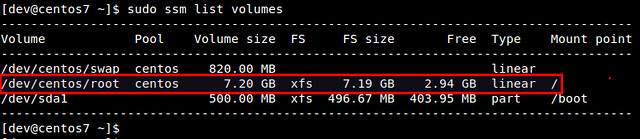
$ sudo ssm list volumes
We can confirm that the size of /dev/centos/root volume has increased from 6.7GB to 7.2GB. However, this does not mean that you can immediately utilize the extra space within the file system created inside the volume. You can see that the file system size ("FS size") still remains as 6.7GB.
To make the file system recognize the increased volume size, you need to "expand" an existing file system itself. Depending on which file system you are using, there are different tools to expand an existing filesystem. For example, use resize2fs for EXT2/EXT3/EXT4, xfs_growfs for XFS, btrfs for Btrfs, etc.
After expanding an XFS file system, verify that file system fully occupies the entire disk volume 7.2GB.
Create a New LVM Pool/Volume
In this experiment, let's see how we can create a new storage pool and a new LVM volume on top of a physical disk drive. With
traditional LVM tools, the entire procedure is quite involved; preparing partitions, creating physical volumes, volume groups, and logical volumes, and finally building a file system. However, with
ssm, the entire procedure can be completed at one shot!
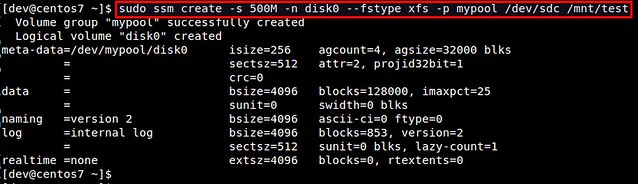
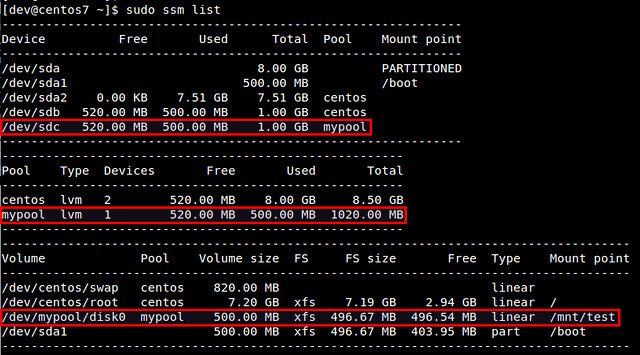
What the following command does is to create a storage pool named mypool, create a 500MB LVM volume named disk0 in the pool, format the volume with XFS file system, and mount it under /mnt/test. You can immediately see the power of ssm.
$ sudo ssm create -s 500M -n disk0 --fstype xfs -p mypool /dev/sdc /mnt/test
Let's verify the created disk volume.
Take a Snapshot of an LVM Volume
Using ssm tool, you can also take a snapshot of existing disk volumes. Note that snapshot works only if the back-end that the volumes belong to support snapshotting. The LVM backend supports online snapshotting, which means we do not have to take the volume being snapshotted offline. Also, since the LVM backend of ssm supports LVM2, the snapshots are read/write enabled.
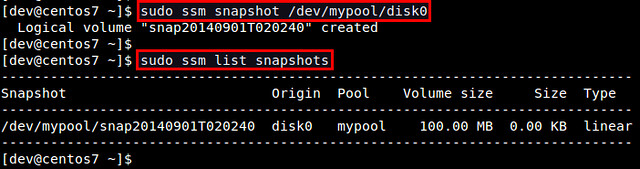
Let's take a snapshot of an existing LVM volume (e.g., /dev/mypool/disk0).
$ sudo ssm snapshot /dev/mypool/disk0
Once a snapshot is taken, it is stored as a special snapshot volume which stores all the data in the original volume at the time of snapshotting.
After a snapshot is stored, you can remove the original volume, and mount the snapshot volume to access the data in the snapshot.
Note that when you attempt to mount the snapshot volume while the original volume is mounted, you will get the following error message.
kernel: XFS (dm-3): Filesystem has duplicate UUID 27564026-faf7-46b2-9c2c-0eee80045b5b - can't mount
Remove an LVM Volume
Removing an existing disk volume or storage pool is as easy as creating one. If you attempt to remove a mounted volume, ssm will automatically unmount it first. No hassle there.
To remove an LVM volume:
$ sudo ssm remove <volume>
To remove a storage pool:
$ sudo ssm remove <pool-name>