2016年3月16日 星期三

Linux Centos 6 add static route

http://www.cyberciti.biz/faq/centos-linux-add-route-command/


CentOS Linux: Add Static Routing

Iam a new CentOS Linux sysadmin. How can I add static route On CentOS Enterprise Linux server running on HP amd64 server?

You can use any one of the following command line utility to add, delete, display, or manipulate the Linux kernel routing table on CentOS and friends:
  1. ip command – A CentOS Linux command line tool to print / manipulate routing, devices, policy routing and tunnels.
  2. route command – Older command line utility to show or manipulate the Linux kernel routing table. I suggest that you use ip command instead of route command. This command exists for historical and compatibility reasons only.
You need to edit the following configuration files for static route configuration :
  1. /etc/sysconfig/network – Edit this file to set default gateway IP address.
  2. /etc/sysconfig/network-scripts/route-ethX – Edit this file to set additional static gateway IP address.

CentOS: Displaying current routing table

Type any one of the following command:
# netstat -nr
# route -n
# ip route list

Sample outputs:
Fig.01: ip command displaying current CentOS Linux routing table
Warning: It is important that you configure routing correctly over ssh based session; otherwise, you will be locked out due to wrong network configuration.

CentOS Linux add a default gateway

In this example, route all traffic via 192.168.1.254 gateway connected via eth0 network interface. The following command will set a default gateway for both internal and external network (if any):
# route add default gw 192.168.1.254 eth0
OR
# ip route add 192.168.1.0/24 dev eth0

How do I make routing changes persistent across CentOS Linux server reboots?

To set default gateway edit /etc/sysconfig/network as follows:
# cat /etc/sysconfig/network
Sample configuration file:
NETWORKING=yes
## server name ##
HOSTNAME=server1.cyberciti.biz
## Default route ##
GATEWAY=192.168.1.254
NETWORKING_IPV6=yes
IPV6_AUTOCONF=no
Save and close the file. Restart the networking service on CentOS Linux, type:
# service network restart
# ip route list

To verify new settings ping to the default gateway and external network:
# ping 192.168.1.254
# ping www.cyberciti.biz
# host google.com

CentOS Linux static routing config for eth1 interface

The following is a sample route-eth1 file. The default gateway set to 192.168.2.254, interface eth1. The static route is 10.10.29.65 for 10.0.0.0/8 network:
# cat /etc/sysconfig/network-scripts/route-eth1
Sample configurations:
default 192.168.2.254 dev eth1
10.0.0.0/8 via 10.10.29.65 dev eth1
Alert: For eth0 interface use /etc/sysconfig/network-scripts/route-eth0 file. Avoid setting duplicate default gateways; either use /etc/sysconfig/network or/etc/sysconfig/network-scripts/route-ethX file. Do not use both files to configure default gateways.

A note about GUI/TUI tool

If you don’t have X windows GUI (gnome/kde desktop) installed on CentOS server / system, than type the following command at shell prompt. This method can only set the default gateway. It can not be used to set additional static routing for interface. Type the following command:
# system-config-network-tui &
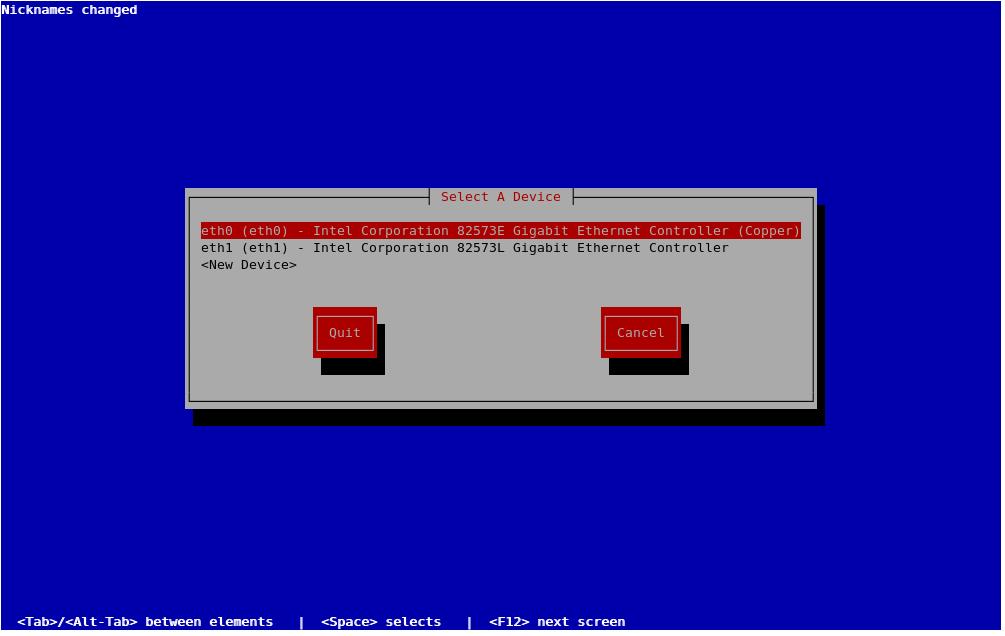
Fig.01: CentOS command line network config tool (click to large)
Select your Ethernet card such as eth0 or eth1 and hit [Enter] or [F12] special key to configure IP properties for selected NIC:
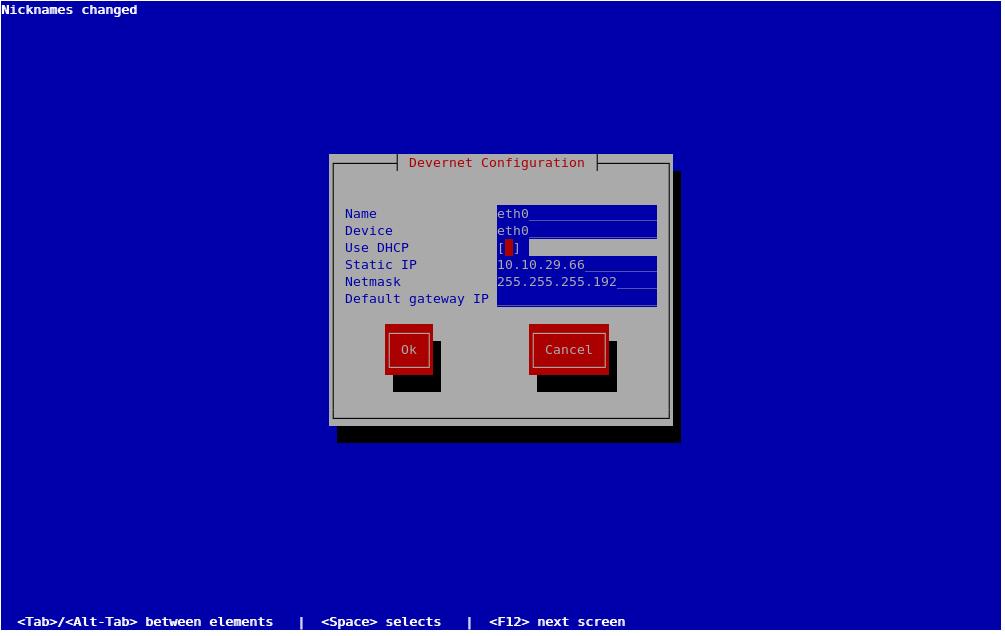
Fig.02: Setting up IPv4 properties on CentOS including default gateway (click to large)
You can obtain an IP address using DHCP or setup IP address manually. Once an IP address assigned, click on the Ok button to save the changes. See how to configure networking on CentOS / RHEL / Fedora Linux tutorial for more information.
Recommended readings
{ 2 comments… add one }
  • BT February 23, 2014, 8:24 am
    you left out “via” on your sample config, should be
    default via X.X.X.X dev interface
  • Jhon Edison August 25, 2015, 4:19 am
    Gracias!!! funciona..
Leave a Comment

2016年2月29日 星期一

Deploy Public Key TXT in BIND Server

https://www.emailarchitect.net/domainkeys/doc/html/object_deploy.htm


Deploy DomainKeys/DKIM Public Key in DNS Server


Deploy Public Key TXT in BIND Server
If your domain is hosted by Bind DNS server, you can add DKIM public key record like this: locate your domain's zone file and open it with your preferred editor, then add the following content:
 ; DKIM policy record
 _domainkey.yourdomain.com.            IN     TXT    "o=~;"
 ; DKIM public key record
 s1024._domainkey.yourdomain.com.      IN     TXT    "k=rsa;p=MIGfMA0GCS....ofIz0IW7QwIDAQAB"


Deploy Public Key by DKIM Manager
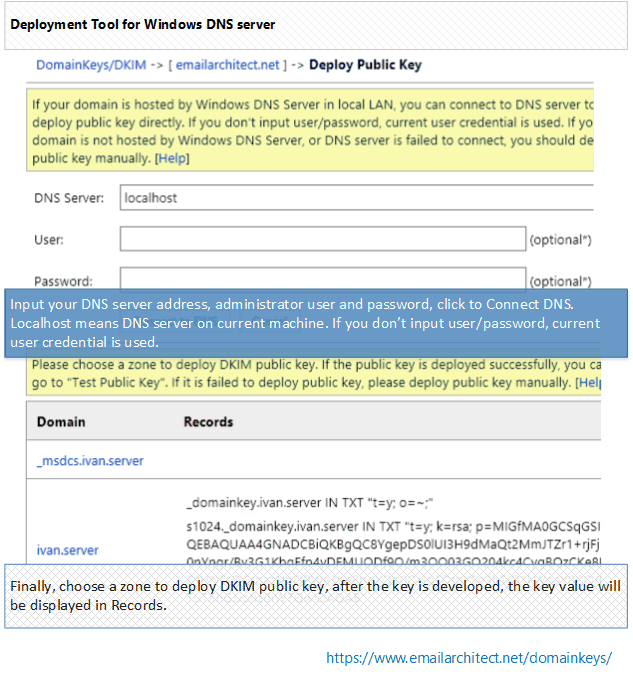
If your domain is hosted by Windows DNS Server in local LAN. After you added a domain in DKIM Plugin Manager, you can select the domain and click "Deploy Key", input your DNS server address and choose the DNS zone, the public key will be deployed to DNS server automatically.
Windows DNS Tool

Deploy Public Key Manually
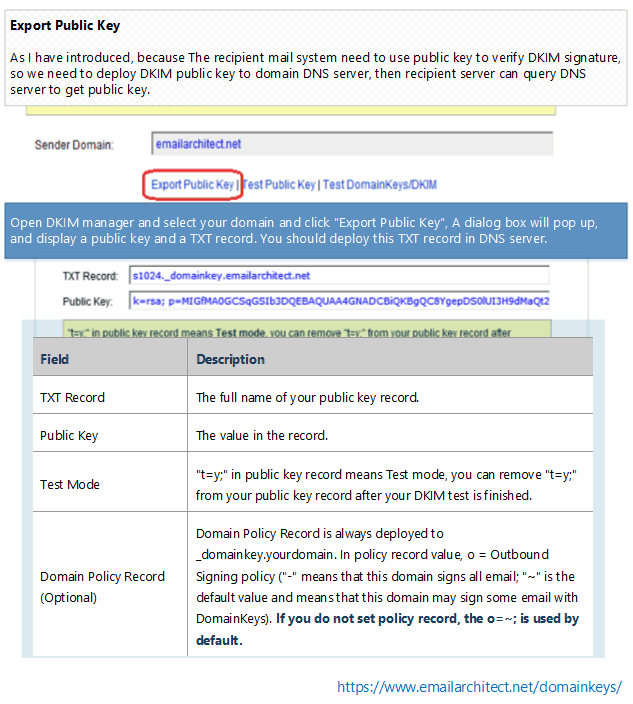
If your domain is not hosted by Windows DNS server in local LAN, or it is failed by "Deploy Key" in DKIM manager, you can select the domain and click "Export Public Key". A dialog box will pop up and display a Public Key and a TXT record for deployment in your DNS server.
export dkim public key
TXT Record
The full name of your public key record.
Public Key
The value in the record.
Test Mode
"t=y;" in public key record means Test mode, you can remove "t=y;" from your public key record after your DKIM/DomainKeys test is finished.
Domain Policy Record (Optional)
Domain Policy Record is always deployed to _domainkey.yourdomain. In policy record value, o = Outbound Signing policy ("-" means that this domain signs all email; "~" is the default value and means that this domain may sign some email with DomainKeys). If you do not set policy record, the o=~; is used by default.

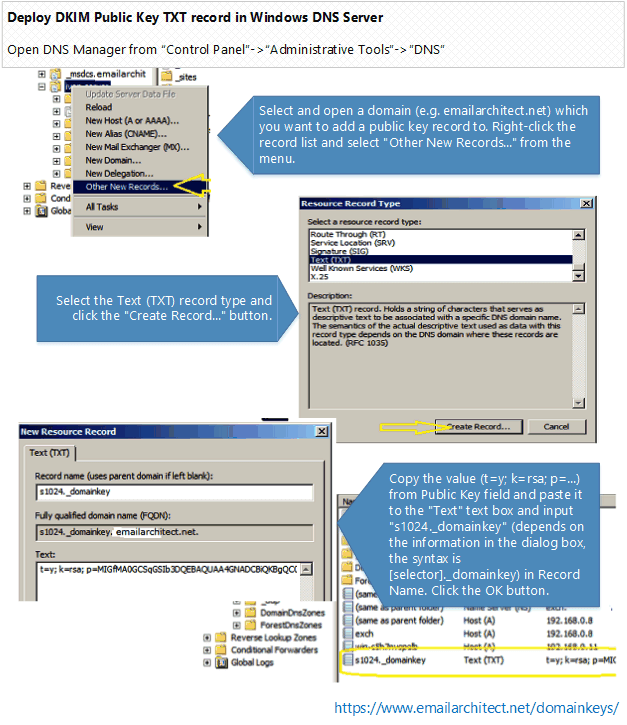
Deploy Public Key TXT record in Windows DNS Server
windows dns
Step 1: Select and open a domain (e.g. emailarchitect.net) which you want to add a public key record to. Right-click the record list and select "Other New Records..." from the menu.
Step 2: Select the Text (TXT) record type and click the "Create Record..." button.
Step 3: Copy the value (t=y; k=rsa; p=...) from Public Key field and paste it to the "Text" text box and input "s1024._domainkey" (depends on the information in the dialog box, the syntax is [selector]._domainkey) in Record Name. Click the OK button.

(Windows 2000 DNS Server*)
windows 2000 dns
If you're using Windows 2000 DNS server, you should create "_domainkey" domain under "your domain" at the beginning, and then create "s1024" TXT record under "_domainkey" sub-domain. The reason is that creating "s1024._domainkey" TXT record directly is not permitted in Windows 2000 DNS server.

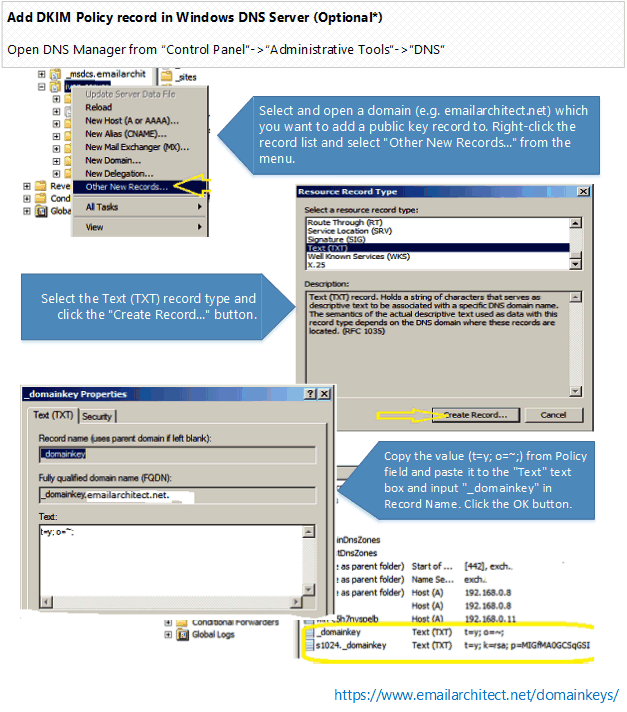
Add Policy record in Windows DNS Server (Optional*)
dkim policy record
Step 1: Select and open a domain (e.g. emailarchitect.net) which you want to add a public key record to. Right-click the record list and select "Other New Records..." from the menu.
Step 2: Select the Text (TXT) record type and click the "Create Record..." button.
Step 3: Copy the value (t=y; o=~;) from Policy field and paste it to the "Text" text box and input "_domainkey" in Record Name. Click the OK button.
*This record is optional, you don't have to add it. If you do not set policy record, the o=~; is used by default.

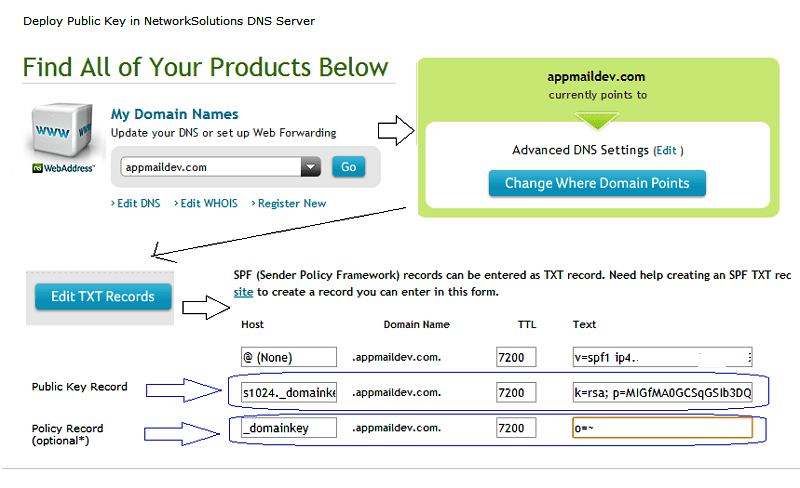
Deploy Public Key TXT in Network Solutions DNS server
public key in networksolutions
If your domain is hosted by www.networksolutions.com, you can deploy your public key like this:
Step 1: Select your domain
Step 2: Select the "Edit TXT Record.
Step 3: Copy the value (t=y; k=rsa; p=...) from Public Key field and paste it to the "Text" text box and input "s1024._domainkey" (depends on the information in the dialog box, the syntax is [selector]._domainkey) in Host. Click the "Continue" button.
Step 4 (optional*): Copy the value (t=y; o=~;) from Policy field and paste it to the "Text" text box and input "_domainkey" in Host. Click the OK button.


Deploy Public Key TXT in other DNS server
If your domain is hosted by other ISP, as most ISP provide DNS Web administration like "network solutions" do, you can refer to "Deploy Public Key TXT in Network Solutions DNS server" section and deploy your public key in your ISP DNS Web administrative tool.
If you are not DNS server administrator, or your domain is hosted by other DNS server, please send the information in dialog box->DNS Public Deployment to your domain DNS server administrator for assistant.

Test Public Key Deployment
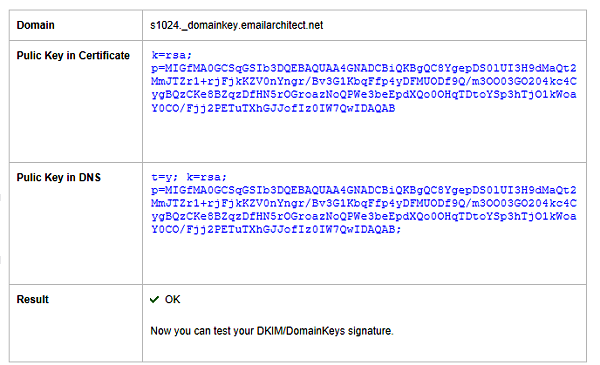
After the Public Key in DNS server is deployed, you can click "Test Public Key" in EA DomainKeys/DKIM Manager to verify the public key. It will tell if your public key is deployed correctly. After your public key is ok, you can go to "Test DomainKeys/DKIM signature".
public key test
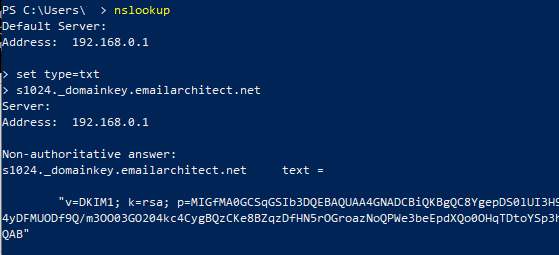
You can also use nslookup command to test your public key as follows:
nslookup
Windows Start menu->input:
nslookup
press enter

input:
set type=txt
press enter

input ([selector]._domainkey.yourdomain):
s1024._domainkey.yourdomain
If your key is deployed successfully, it should return something like above screenshot.

2048 Public Key Deployment
Because single DNS TXT record is limited to 255 characters, public key length of 2048 certificate exceeds the limit. So you need to separate public key to two parts in DNS server.
In Windows DNS Server, you should use line-break to separate the long public key
k=rsa; p=k=rsa; p=MIGfMA0GCSqGSIb3DQEBAQUAA4GNADCBiQKBgQC8YgepDS0lUI3H9dMaQt2Mm...
JTZr1+rjFjkKZV0nYngr/Bv3G1KbqFfp4yDFMUODf9Q/m3OO03GO204kc4CygBQzCKe8BZqzDfHN5rOG...;
In BIND Server, you should deploy key as follows:
s1024._domainkey.yourdomain.com. IN TXT ("k=rsa; p=MIIBIjANBgkqhkiG9w0BAQEFAAOCAQ8AMIIBCgKCAQEAiv..."
                                    "2LjDmbvj6V82iSnW3lAg3Sr212o4JnKm7iFAT6diDvItDzA//5botwDpk9jrRFxi...")

;OR
s1024._domainkey.yourdomain.com. IN TXT "k=rsa; p=MIIBIjANBgkqhkiG9w..." "2LjDmbvj6V82iSnW3lAg3Sr212o4..."


See Also
Online

2016年2月14日 星期日

Cisco Router log timestamp entries are different from the system clock when the NTP is configure

https://supportforums.cisco.com/document/24156/router-log-timestamp-entries-are-different-system-clock-when-ntp-configure


Router log timestamp entries are different from the system clock when the NTP is configure

Document

Mon, 10/19/2015 - 02:44
 7 years ago

Core Issue:

Timestamps are useful for viewing when certain events happen on a router. Timestanps are also helpful for troubleshooting, because they allow the network administrator to compare simultaneous events on network routers and analyze whether one occurrence caused, or was a result of, another.
If a router is configured to get the time from a Network Time Protocol (NTP) server, the times in the router's log entries may be different from the time on the system clock if the [localtime] option is not in the service timestamps log command. In the example below, the router gets its time from an NTP server and theservice timestamps log datetime command is issued. Theshow clock command displays a time of 14:12:26, yet when a configuration change is made immediately after the show clock command, the log message shows a time of 21:12:28, as shown in this example:

clock timezone PST -8
clock summer-time PDT recurring
service timestamps debug datetime
service timestamps log datetime
logging buffered 16000 debugging
ntp clock-period 17179272
ntp server 161.181.92.152

router#show clock
14:12:26.312 PDT Thu Apr 27 2000
router#config t
Enter configuration commands, one per line. End with CNTL/Z.
router(config)#exit
router#
Apr 27 21:12:28: %SYS-5-CONFIG_I: Configured from console by vty0

Resolution

Add the [localtime] option to the service timestamps log command. For example, if the current configuration is service timestamps log datetime, issue this global configuration command:
router(config)#service timestamps log datetime localtime
router(config)#^Z (ctrl z to exit)
router#write mem

The times should now be synchronized between the system clock and the log message timestamps.